1.10.5. Recommended setup for editing docs in VS Code
1.10.5.1. Set up Python
The Python packages needed for this setup are listed at doc/ctsm-docs_container/requirements.txt. If you recently installed the ctsm_pylib conda environment, they will already be included there. Check like so:
conda activate ctsm_pylib
pip show myst-parser
If you see WARNING: Package(s) not found: myst-parser, you'll need to install the doc-building Python modules. With your conda environment activated (or in whatever other environment you want to use), from the top level of a CTSM checkout, do:
pip install -r doc/ctsm-docs_container/requirements.txt
You will need to provide the path to your Python binary in various VS Code settings detailed below. You can get that with which python (after loading the relevant conda environment, if needed).
1.10.5.2. Install required VS Code extensions
1.10.5.3. Change VS Code settings for Esbonio extension
Important
This setup will work only if you've opened the top level of a CTSM checkout as a VS Code workspace.
Open VS Code's settings. (To restrict the list to only settings related to this setup, you can access the Esbonio settings via the gear icon on its item in the Extensions menu.) You're going to change a few things, but note that VS Code can have up to three tabs (representing "scopes") across the top of the Settings page: User, Remote [SSH: remotename], and Workspace. Below, we'll explain which setting should be set in which scope(s). Keep in mind that scopes going left to right get more specific, and a setting in a later (rightward) scope will always override the same setting in an earlier (leftward) scope.
1.10.5.3.1. Build command
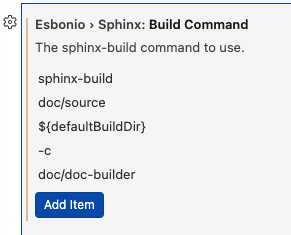
Esbonio > Sphinx: Build Command in the Settings GUI: This is an annoying one. We want to tell it to use sphinx-build doc/source ${defaultBuildDir} -c doc/doc-builder, but each word there has to be its own element in a list.
It might be easier to open your VS Code's settings.json file(s) for this. You'd simply add:
"esbonio.sphinx.buildCommand": [
  "sphinx-build",
  "doc/source",
  "${defaultBuildDir}",
  "-c",
  "doc/doc-builder"
]
Note that it needs to be proper JSON syntax, though. So in context it looks like this if it's at the end of the file (your indentation may vary):
"chat.disableAIFeatures": true,
"esbonio.sphinx.buildCommand": [
  "sphinx-build",
  "doc/source",
  "${defaultBuildDir}",
  "-c",
  "doc/doc-builder"
]
}
Note the comma at the end of the preceding line, and the curly bracket on the very last line of the file.
As far as which scope to use: If you're always or usually going to be using Esbonio to preview docs for CTSM, you should put this in the User scope. You can open your User settings.json by searching in the Command Palette for user settings json. For other projects using Esbonio, you will be able to set a Workspace-level esbonio.sphinx.buildCommand to override your User default.
1.10.5.3.2. Python command
Esbonio > Sphinx: Python Command. Do not get this confused with Esbonio > Sphinx: Build Command from above, or the similar Esbonio > Server: Python Command. This one you're going to have to edit in settings.json:
"esbonio.sphinx.pythonCommand": "/path/to/your/python",
The path is what you got from which python above. See the note about proper JSON syntax in "Build command" above.
Which settings scope?
If you're working on your local machine, User: Search in the Command Palette for
user settings json.If you're working on a remote machine, Remote: Search in the Command Palette for
remote settings json.
1.10.5.3.3. Finishing up
Once you've made those settings changes, reload the window (search reload window in the Command Palette).
1.10.5.4. Previewing
This will take a while the first time you build the previews during a session.
(Optional but recommended, at least the first time) In the View menu, select Output. In the drop-down menu at the top right of the Output panel, select Esbonio.
Open a documentation source file (.rst or .md).
Search
Esbonio: Preview Documentation in Split Window(or any subset of those words) in the Command Palette. Select it and this should open a pane next to the documentation source file that is initially empty.If you opened the Esbonio Output panel (or open it now), you'll see it working. This can take a while, especially if it's doing a clean build (such as the first time you do this).
Once it's done, the preview pane should fill in.
When you make changes to and save a documentation source file, Esbonio will re-generate the preview for that file. This should be relatively quick, since it's not doing a clean build—just a new build of that file in particular. However, you may need to close and re-open the preview pane before you see your changes. Also, there are some types of changes you can make to one file that will affect other files (such as changing a section label that is cross-referenced in a different file). Esbonio will not know to rebuild those other files. To force a clean build, try the Esbonio: Restart Language Server command in the Command Palette. Failing that, you can try deleting the directory referenced in the "The HTML pages are in" message printed in the Esbonio Output log.
Some other tips:
If you see long lines in the editor that require you to scroll far to the right, search the Command Palette for "word wrap" and select
View: Toggle Word Wrap. These long lines are intentional (see style guide).Once the preview is ready, you can scroll in either the source file or the preview and they will stay approximately in sync with each other.
You should be able to open other source files and get their preview instantly.
More info on features can be found on the Esbonio VS Code Extension page